
instructions
The Alaskan Gun Guard
How to apply the Alaskan Gun Guard to your firearm

the features of the alaskan gun guard
HOW TO APPLY THE ALASKAN GUN GUARD TO YOUR EBIKE OR FAT BIKE
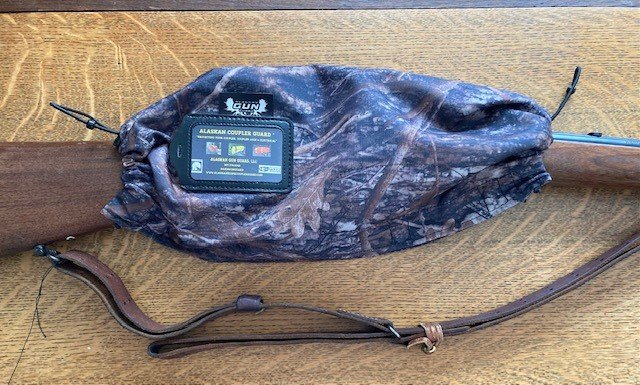
The alaskan coupler guard
the special features of the coupler guard
How the Alaskan Coupler Guard Works
Rifle Application

step 1
Make sure the firearm is unloaded and Safety is on. Then lay the firearm on its side. Lay the Gun Guard above the firearm, positioning the Range Card Holder over the Trigger area.

step 2
Open up the Gun Guard and lay the firearm on top. Notice that when the Range Card Holder is properly placed, this then places the “No-Slip Grips” into their proper position.

step 3
Fold up the lower edge of magnets.

step 4
Fold the top section over the firearm and on top of the lower edge of magnets.

step 5
Tighten the draw cords at both the pistol grip area and at the end or the forearm.

step 6
You can then reverse the magnets for either right or left-hand use. The objective is to have the opening downward when laying the firearm across your lap, and also when using a gun rack on an ATV or EBike to have the opening toward you as the rider.
Shotgun application

step 1
Make sure the firearm is unloaded and Safety is on. Lay the firearm on its side. Lay the Gun Guard above the firearm, with the Range Card Holder over the Trigger Area.

step 2
Open up the Gun Guard and lay the firearm on top. Notice that when the Range Card Holder is properly placed, that this then places the “No-Slip Grips” into their proper position.

step 3
Fold up the lower edge of magnets.

step 4
Fold over the top section over the firearm and on top of the lower edge of magnets.

step 5
Tighten the drawcords at both ends. You can then reverse the magnets for right or left-hand use. The opening should be toward the ground when laying across your lap or facing you while in a gun rack on an ATV or an E-Bike.

step 6
Once at or in your stand you can then place the front two and rear two magnets above the barrel and stock. Then place the middle magnet on both sides of the receiver.
Black Rifle Model - Application
Step 1. Place firearm upright or lay Gun Guard on a flat surface with inside up.
Step 2. Overlay the Gun Guard over the firearm on the lower half of the Fun Guard.
Step 3. Fold the top half of the Gun Guard over the firearm, aligning the middle magnet in front of the magazine and the back magnet behind the pistol grip. Tighten both draw cords and the lock.

Black Rifle Model - Shotgun Application
Step 1 - Open the Alaskan Gum Guard - Black Rifle Model and lay flat with the Range Card Holder placed so that it will fold over the Trigger Guard Area. Lay the unloaded Shotgun on the lower half of the Gun Guard.
Step 2 - Fold the upper half of the Gun Guard over the shotgun to connect with the opposite magnets. Then tighten the draw cords at each end as needed.
** The magnets do not overlap as in the standard Gun Guard, as the Black Rifle Model magnets are not set up to reverse.
Step 1 - Open the Alaskan Gum Guard - Black Rifle Model and lay flat with the Range Card Holder placed so that it will fold over the Trigger Guard Area. Lay the unloaded Lever Action Rifle on the lower half of the Gun Guard.
Step 2 - Fold the upper half of the Gun Guard over the Lever Action Rifle to connect with the opposite magnets. Then tighten the draw cords at each end as needed.
** The magnets do not overlap as in the standard Gun Guard, as the Black Rifle Model magnets are not set up to reverse.


Black Rifle Model - Lever Action Application